☀What is an On-Grid Solar System?
An On-Grid Solar System (also called Grid-Tied or Grid-Connected solar system) is a type of solar power setup that is connected to the public electricity grid. It generates solar power during the day and supplies it to your home or business. If there’s excess, it’s sent to the grid. When solar isn’t enough (like at night), you pull electricity from the grid.
✅ Main Goal: Reduce electricity bills by using solar energy and exporting surplus power.
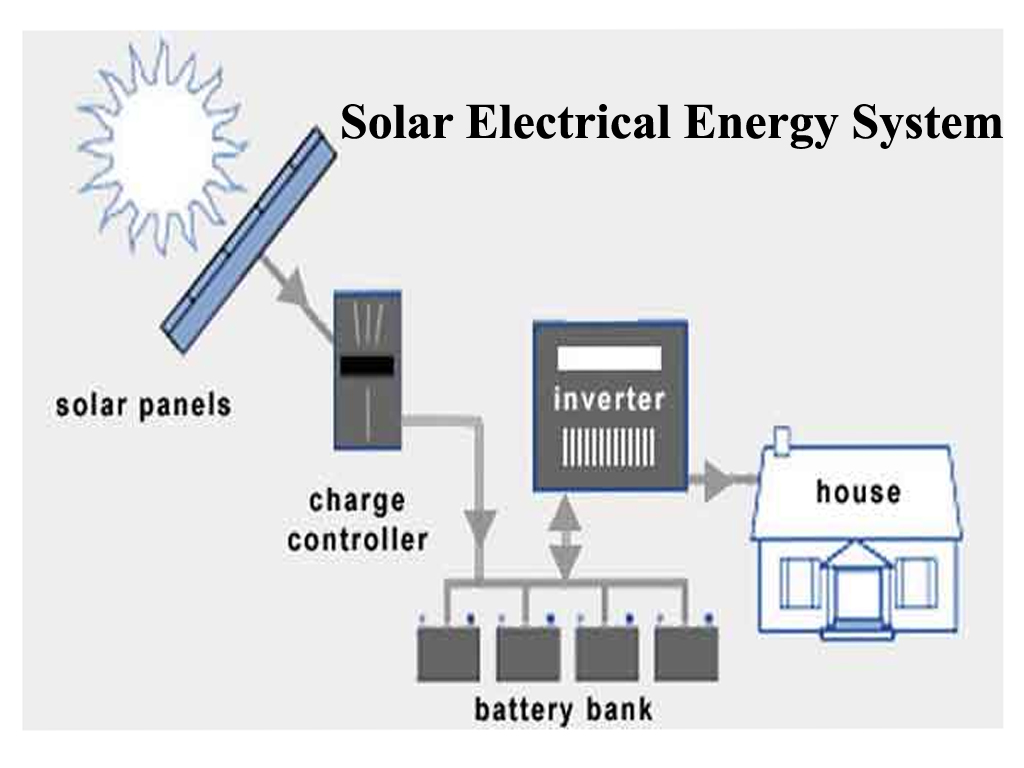
⚙ How Does an On-Grid Solar System Work?
Here’s the basic working step-by-step:
- Sunlight hits the solar panels, which convert it into DC electricity.
- Solar inverter converts DC into AC electricity (the kind your home appliances use).
- The AC power is used to run your electrical appliances.
- If the solar power is more than your usage, the extra electricity is exported to the grid (you earn credits).
- If your consumption is more than solar production, you import power from the grid.
- A net meter records how much power you import and export.
- Your electricity bill is based on net usage (import – export).
Let’s say your home uses 300 units (kWh) per month. A 3 kW on-grid solar system can generate ~360–400 units monthly depending on sunlight. You may get a zero bill if your generation exceeds your usage, especially with net metering.
🧰 Equipment of an On-Grid Solar System
- Solar Panels (PV Modules)
Capture sunlight and generate DC electricity. - Inverter (Grid-Tied Inverter)
Converts DC to AC and syncs with the grid’s voltage and frequency. - Net Meter
Bi-directional meter that tracks power sent to and received from the grid. - Mounting Structures
Frames to hold and angle solar panels on rooftops or the ground. - AC & DC Cables
connect various components, sized for safety and efficiency. - Distribution Box (DB)
Has breakers and fuses for protection. - Monitoring System (optional but useful)
Allows real-time tracking of solar power generation. - Combiner Box (for larger systems): This box combines the DC output from multiple solar panels into a single feed to the inverter.
⚡ Types of On-Grid Solar Systems by size:
1. 🏠 Residential On-Grid Solar System
- Used in: Homes and small apartments
- Size Range: 1 kW to 10 kW
- Purpose: Reduce household electricity bills
- Features:
- Net metering enabled
- Rooftop installation
- No battery storage
- Example: A 3 kW system for a home consuming ~300–400 units/month.
2. 🏢 Commercial On-Grid Solar System
- Used in: Offices, schools, commercial buildings
- Size Range: 10 kW to 100 kW+
- Purpose: Offset high electricity bills in businesses
- Features:
- Larger solar array
- May include advanced monitoring
- High return on investment
- Example: A 50 kW system for an office building.
3. 🏭 Industrial On-Grid Solar System
- Used in: Factories, manufacturing plants, large warehouses
- Size Range: 100 kW to several MW
- Purpose: Reduce dependency on expensive grid power
- Features:
- Custom-designed to match load profiles
- Usually ground-mounted or on large rooftops
- Power purchase agreements (PPA) possible
- Example: A 1 MW plant for a textile factory.
4. 🔁 Net Metered On-Grid System
- Special Feature: Includes a net meter that records both exported and imported energy.
- Billing: You only pay for the net consumption.
- Benefits: Maximum bill savings.
5. 🔌 Gross Metered On-Grid System
- Less Common (depends on region and policy)
- Special Feature: All solar energy is exported to the grid, and you’re paid for it at a fixed rate.
- Drawback: You still pay full price for the grid electricity you use.
- Used in: Utility-scale solar farms or in places where net metering isn’t available.
6. 🔄 On-Grid with Export Limiter
- Used in: Areas where grid export is restricted or disallowed.
- How it works: You can use solar power but not feed extra into the grid.
- Installed with: Export Limiter or Zero Export Device
- Useful when: Net metering isn’t approved or grid is unstable.
7. 🔋 On-Grid with Battery Backup (Hybrid Light Version)
- Technically still grid-tied, but includes a small battery backup.
- Benefit: You still get some power during grid failures.
- Note: Not a full hybrid system, but a flexible on-grid version with limited storage.
✅ Choosing the Right Type:
Depends on:
- Your electricity usage
- Availability of net metering
- Budget and space
- Whether backup power is needed
⚡ Types of On-Grid Solar Systems by inverter used:
String Inverter Systems:
- How they work: In this most common type, solar panels are connected in series to form “strings.” The DC electricity from each string is then sent to a central string inverter, which converts it into AC power.
- Advantages: Generally the most cost-effective option, simpler design, and easier to troubleshoot.
- Disadvantages: The performance of the entire string is limited by the weakest performing panel (e.g., due to shading). Panel-level monitoring is not built-in (though it can be added). System expansion can be more complex.
- Best suited for: Unshaded roofs with a single or very few orientations.
Micro inverter Systems:
- How they work: A micro inverter is a small inverter installed directly on the back of each individual solar panel. Each micro inverter converts the DC electricity from its panel into AC electricity right at the roof level. The AC power from all micro inverters is then wired together and sent to your home’s electrical system.
- Advantages: Optimizes the performance of each panel individually, so shading or a malfunctioning panel won’t significantly affect the output of the rest of the system. Enables panel-level monitoring. Easier system expansion. Meets rapid shutdown safety requirements.
- Disadvantages: Higher upfront cost compared to string inverters. More components on the roof can potentially increase complexity.
- Best suited for: Roofs with shading issues, multiple orientations, or complex layouts.
Power Optimizer Systems:
- How they work: Power optimizers are DC-DC converters installed at each solar panel. They perform Maximum Power Point Tracking (MPPT) at the individual panel level to optimize the DC output of each panel. However, unlike micro inverters, they don’t convert DC to AC. Instead, the optimized DC power is sent to a central string inverter, which then performs the DC to AC conversion.
- Advantages: Maximizes energy harvest by addressing panel mismatch due to shading or other factors. Enables panel-level monitoring. Can sometimes allow for longer string lengths. Offers rapid shutdown capabilities. Can be more cost-effective than micro inverters for some complex installations. Often compatible with DC-coupled battery storage solutions.
- Disadvantages: Requires both power optimizers at each panel and a compatible string inverter, which can increase overall system cost compared to a basic string inverter system.
- Best suited for: Systems with partial shading, multiple roof orientations, and those considering adding battery storage.
🔧 On-Grid Solar System Installation Process (Step-by-Step)
1. 📝 Site Survey & Feasibility Assessment
- What’s done:
- Inspect your rooftop or land
- Check direction, tilt, shadow-free area
- Analyze your energy consumption (electricity bills)
- Evaluate structural strength
- Why it’s important: Ensures proper sizing and optimal energy generation.
2. 📐 System Design & Engineering
- Design team creates:
- Panel layout (string design)
- Inverter and DB placement
- Load analysis and expected generation
- Single Line Diagram (SLD)
- Software tools like PVsyst or Helioscope may be used.
3. 🏛️ Approvals & Net Metering Application
- Apply for:
- Net metering with your local electricity board (DISCOM)
- Permission for grid interconnection
- Documents typically needed:
- ID proof, property proof
- Previous electricity bills
- System design & proposal
- Note: Approval times can vary (1 week to 1 month+)
4. 🛒 Procurement of Equipment
- Major components:
- Solar panels (mono/poly crystalline)
- On-grid inverter
- Mounting structure
- AC/DC cables
- Earthing kit, lightning arrestor
- Distribution box
- Net meter (if not provided by DISCOM)
- Tip: Choose quality components with certifications (e.g., IEC, MNRE, BIS).
5. 🏗️ Installation & Mounting
- Steps:
- Fix mounting structures on rooftop
- Install solar panels on the frames
- Cable routing and fixing
- Orientation & Tilt: Panels usually face south in the northern hemisphere for best efficiency.
6. 🔌 Electrical Connections
- Connect:
- Panels to inverter (DC side)
- Inverter to AC DB (AC side)
- Inverter to grid via net meter
- Safety measures:
- Proper earthing
- Surge protection
- Circuit breakers (MCBs, MCCBs)
7. ⚡ Testing & Commissioning
- Final Checks:
- Voltage, current, insulation, polarity
- Synchronization with grid
- Inverter functionality and monitoring
- Trial run is done to ensure the system is running efficiently.
8. ✅ Inspection by DISCOM (for Net Metering)
- DISCOM officers inspect:
- Installation quality
- Safety compliance
- Meter connections
- After approval, net meter is activated.
9. 📱 Monitoring System Setup
- Most inverters support Wi-Fi or app-based monitoring.
- You can track:
- Daily generation
- Export/import stats
- System health and alerts
10. 📂 Handover & Documentation
- You receive:
- Operation Manual
- Warranty documents
- Final system layout & diagram
- Maintenance checklist
🔁 Ongoing Maintenance (Post-Installation)
- Clean panels every 10–15 days (depending on dust levels)
- Check cables and inverter display regularly
- Annual professional inspection is recommended
📌 Installation Timeframe:
- Small systems (1–5 kW): ~5–7 days
- Medium to large systems (10–100 kW): ~1–3 weeks
- Approval & net metering: Additional 2–4 weeks
✅ Advantages of On-Grid Solar Systems
- Lower Electricity Bills
Use solar power during the day and earn credits by sending excess to the grid. - Cost-Effective
Cheaper than off-grid systems since there’s no battery. - Easy Maintenance
Fewer components (no batteries) = less maintenance. - Space-Efficient
Great for rooftops, offices, factories, and homes. - Incentives & Net Metering
Many governments provide subsidies and net metering benefits.
❌ Disadvantages of On-Grid Solar Systems
- No Power during Grid Outage
If the grid goes down, the system shuts off (for safety). No backup power unless you have a hybrid setup with batteries. - Requires Grid Connectivity
Not suitable for remote areas without a utility grid. - Dependence on Net Metering Policies
Savings depend on local policies, which may change. - Initial Investment
High upfront cost (though pays back over time).